Using an Aeropress coffee maker is a great way to make a delicious cup of coffee. However, your coffee maker will start brewing coffee with a bit of a muddy taste if you don’t clean it regularly.
Coffee oils and small particles are left inside the Aeropress each time you brew a cup of coffee. Not only can they lead to the growth of bacteria, mold, and yeast that are harmful to your health, but they can also decrease the longevity of your device.
That’s why it’s important to clean your coffee maker regularly. In this article, I’ll discuss a step-by-step guide that will help you learn how to clean Aeropress.
How to Clean Aeropress
Cleaning your Aeropress isn’t a difficult task but you need to use the right approach to achieve the most effective results. Use the following steps to make sure that each part of your coffee maker is cleaned thoroughly. It’ll allow you to enjoy the ideal taste of your favorite coffee every day.

Step 1: Gather Supplies
You’ll need to use the following supplies to complete the Aeropress cleaning process efficiently.
- Vinegar or denture cleanser tablets
- Big container
- Lukewarm water
- Dish soap
- Sponge
- Small brush with soft nylon bristles
- Soft towel or microfiber cloth
Step 2: Disassemble the Aeropress
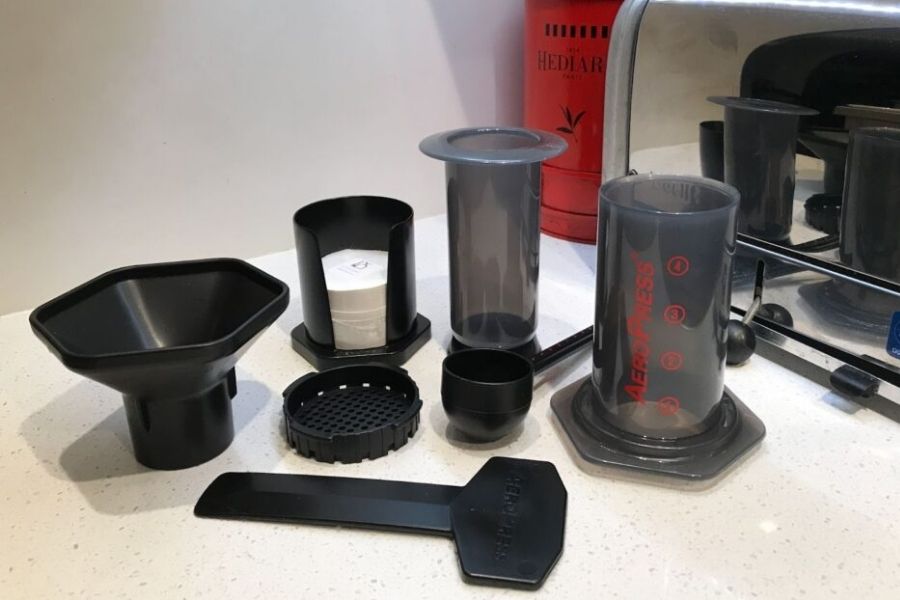
Primarily, an Aeropress consists of four different parts including a chamber, plunger, rubber seal, and filter cap. You’ll need to disassemble all these parts so that you can clean them properly one by one. Use the following steps to dismantle your coffee maker in the right way.
- Grab the filter cap located on the bottom side of your Aeropress and pull it to remove it from its place.
- Press the plunger down to eject all the dried-up and compressed coffee grounds.
- Pull the plunger upwards all the way through and give it a little push to separate it from the chamber.
- Now you’ll see the rubber cap attached to the bottom side of the plunger.
- Pull it gently to separate it from the plunger.
Performing these steps will allow you to separate all four parts of your Aeropress coffee maker from one another.
Step 3: Add Aeropress Parts to Vinegar Solution
After disassembling your Aeropress, you’ll need to place all the parts (except the rubber seal) in a container with vinegar. The acidity of vinegar makes it a powerful substance to clean the coffee maker just like it can help clean your favorite coffee mug.
It can break down coffee oils easily without damaging your coffee maker’s components. In addition, vinegar will also remove bad smells from your Aeropress effectively.
Make sure that you don’t place the rubber seal in vinegar as it can get damaged. Just grab a container in which you can easily place your coffee maker’s parts and fill it with vinegar. You can also use a mixture of lukewarm water and vinegar in equal amounts if you want.
Then, add the plunger, chamber, and filter cap to the container and leave them for 15 to 20 minutes. If you’re using a mixture of lukewarm water and vinegar, you’ll need to wait for at least 30 minutes. That’s because it’ll take more time to dissolve coffee oils and particles due to less acidity.
If you don’t want to use vinegar, you can opt for denture cleanser tablets. These tablets have sodium bicarbonate that can remove coffee oils and stains effectively. You only need to add a tablet or two to a water container and place your Aeropress parts in it for 15 to 20 minutes.
Step 4: Clean the Rubber Seal
As the rest of the parts sit in the cleaning mixture, grab the rubber seal and start cleaning it. Create a mixture of lukewarm water and dish soap and dip the sponge in it. Now start rinsing the rubber seal gently from all sides using the sponge.
Make sure that you don’t use hot or boiling water and it’ll deteriorate the seal’s quality. Using a mixture of lukewarm water and soap will be enough to remove coffee oils and stains from the rubber material. Once you have rinsed the seal properly, use fresh water to remove the soapy water and set it aside.
Step 5: Clean the Chamber
Once enough time has passed, remove the chamber from the container of vinegar. The chamber is the component of your Aeropress where coffee grounds spend the most time. Therefore, you’ll need to make sure that you clean it thoroughly.
Use the same soap and lukewarm water mixture and start rinsing the chamber with a nylon brush. Make sure that you rinse the entire inside surface area of the chamber. It’ll allow you to get rid of the residue of vinegar and dissolved coffee particles. Afterward, use fresh water to clean the chamber.

Step 6: Clean the Plunger
Cleaning the Aeropress plunger is the easiest part as it doesn’t directly contact with coffee grounds. You can use the sponge dipped in lukewarm water and soap mixture to rinse the plunger quickly. Make sure that you use fresh water to clean the soap properly so that it doesn’t end up in your cup of coffee.
Step 7: Clean the Filter Cap
Cleaning the Aeropress filter cap is the trickiest part of the entire process as it has a bunch of small holes. They can easily become clogged up with coffee grounds. You’ll need to use the nylon brush dipped in the same soap mixture to clean them.
You can also use a toothpick to get rid of coffee grounds stuck in the holes of the filter cap. Once you have rinsed the component properly, use fresh water to clean the remaining soap and vinegar residue. Make sure to discard the coffee grounds in a trash can and not in your sink, as it might clog your pipes.
Step 8: Dry All Components
After cleaning all components, use a soft towel or microfiber cloth to dry out all the components properly. You’ll need to use a toothpick wrapped in a cloth to clean the holes of the filter cap. In addition, use a hairdryer instead of a cloth or towel to dry the rubber seal. That’s because it can catch small fibers from a towel or cloth.
Step 9: Assemble the Aeropress
Once all the components are cleaned and dried, you’ll need to reassemble them. Attach the rubber seal to the plunger, insert the plunger into the chamber, and attach the filter cap to its place. Now you can start using your Aeropress to make your favorite cup of coffee.
Frequently Asked Questions
The following are some of the most common questions that people ask about cleaning an Aeropress.
How Often Should You Clean the Aeropress?
If you use your Aeropress to make coffee daily, you should clean it using the method discussed above at least once a week. Not only will it allow you to coffee with a delicious taste but it’ll also maximize the lifespan of your device. I also recommend you use tap water to rinse your Aeropress after every use.
Can You Use Dishwater to Clean Aeropress?
Yes, you can use the top shelf of a dishwasher to clean your Aeropress. However, it will not remove the sticky coffee oils stuck inside the chamber and filter cap. You’ll need to use vinegar or denture cleanser tablets to clean your coffee maker thoroughly. These cleaning solutions will not only dissolve sticky coffee residue but they’ll also remove bad smells from your device.
Final Words
Cleaning your Aeropress regularly is important to make and enjoy coffee with great taste. The sticky coffee residue stuck inside a coffee maker not only ruins your coffee taste but can also shorten the device’s lifespan. I hope this guide will help you understand the right method to clean your Aeropress thoroughly.


